; />
Showing posts with label simple. Show all posts

Sunday, 7 September 2014

Bold Brows

Brows. Two little strips of hair that randomly sit on your face and make the world of difference.
To be honest, I do nothing to mine. Truly nothing, and I can get away with the laziness (for the most part) as they're pretty decent. But I've recently been testing out filling them in a little and I can't believe what I difference it actually makes!
Today I filled them in a fair bit more than normal, so it's quite bold but… I like it.
Everything else was kept nice and simple as I felt the brows deserved to be the centre of attention. Whenever I want everything else to be neautal it's always to Mac Ladyblush that I look, I'm wearing it on my cheeks and on my lips (wearing the same colour on your cheeks and lips always makes my face look so put together and I've been doing it most days)
I just pinned my fringe to the side as I couldn't be bothered attempting to tame it - plus I often think doing a simple little twist somehow makes it look like you put some effort into it instead of pinning it straight back… although that might just be me!
Bold Brows definitely aren't something I'm going to be doing everyday, or even every week, but it's something I think I might whip out now and again. Next time I'm pairing it with a strong cat eye so some real bold shapes!

let me know if you fill in your brows on a regular basis? I feel like everyone who blogs seems to,  hopefully I'm not the only one that usually skips this step!

Clean Out

Before I flew to New Zealand I made a consious effort to drastically cut down my make up 'collection'. And I did pretty well. Even so I couldn't take everything with me (shoes took priority over blushes). And now it's been over a year with only a slither of my make up and I've realised I just don't need as much, and in fact I prefer having a more streamlined selection.
I've been watching Christine from Pinksofoxy for a while and I just adore her decluttering videos - seriously you need to go watch a few! They're weirdly therapeutic to watch, not to mention motivating!

So this last week since getting back to the UK I've had a big clear out, and I'm really happy with the result. Everything now fits quite nicely in one drawer and most importantly I wear everything. regularly

It's not the prettiest storage right now but it is practical, and everything will be getting moved into my muji drawers in a month so I'll update you then when it's all looking pretty! For now everything is roughly separated my 'type' with samples kept at the back and my palettes on top.

It's nerdy, but the other motivation behind this was the desire to create a make up itinerary! I've now got a record of every single piece of make up I own and I can find out how many blushes, foundations or lipsticks I own in a second which I'm hoping will keep me in check for future online make up splurges!

It's been a few days since I cleared everything out, and it's so refreshing to just see variety without being overwhelmed!

Sunday, 22 June 2014

Beanie!

This isn't something I'd usually think to put on here, but I bought my first beanie hat! (I think it's a beanie hat… I'm calling it that anyway). I know buying a hat isn't a particularly interesting purchase, but I actually only own one other hat, and that's just a big floppy thing for on the beach. Hat's just don't suit my face so I typically just avoid them, regardless of how much I love hats
I got this one from valley girl here in NZ, and it came with these gem-flowers all along the front. They're definitely not my cup of tea so I just cut them off as I much prefer it plain as the lilac colour is just so pretty! 

Also, I never realised just how warm hats keep you! Silly I know, but I wore this yesterday and I was toasty warm despite the chill in the air - I get why people love their hats in winter now!
As for make up, I kept it super simple, some eyeliner, mascara, a little bit of pencil in my brows and the amazing collection concealer - done. I was just popping to the library (on a saturday?!) so I just couldn't be bothered doing a full face
Let me know what you think of it - I'm still not 100% convinced I don't look silly in it

Saturday, 24 May 2014

Piling it on for Autumn

Winter is definitely creeping in but last week we had a lovely warm spell so I celebrated by throwing my foundations in the corner and whipping out my tinted moisturisers. I'm a little (a lot) obsessed with Laura Mercier's tinted moisturiser, to the point that when it came to going out with som friends for a meal I couldn't bring myself to putting a foundation on despite craving so full coverage. So for one of the first times I layered up.

I'm not a fan of building up foundations, or tinted moisturisers, I apply one layer, buff it in really well and I'm good. If it's not enough coverage then I just accept that's the way that foundation works and smother my face in concealer. (for the most part LM tinted moisturiser gives the perfect daily coverage)
So I put an awful lot of LM's Tinted moisturiser on, and despite being doubtful of the finish, I've fallen even more in love with it. You really can get it to a solid medium, verging on full-ish coverage! And the best bit is the finish doesn't vary - it's still the lovely blend of dewy-satin finish!

Laura Mercier tinted moisturiser, Maybelline Instant Anti-Age Eye Eraser, Benefit they're real, Maybelline liner, Mac Camomile & Patina, Smashbox Avant/Garde, Benefit hula, L'Oreal BrowArtist
and, not pictured here, but lots of Baptiste XXL Volume dry shampoo to make my hair a little crazy
I kept the restt of my make up super simple for the evening, neutral lightly shimmer shadows, a lighter concealer than normal for under my eyes, and I didn't go for a lipstick, as when I'm going out for dinner I just can't bare to put some on when I don't its going to come right off.. and probably into my mouth while eating - not a pleasant thought. 

Wednesday, 14 May 2014

Keeping things simple.

Despite winter being well on it's way here in New Zealand this last week we've had a mini late autumn heat wave. It's not been breaking records or anything but bare legs and suncream have definitely made an appearance. I've wholeheartedly embraced the warmer weather and my make up has been kept to a complete minimum, as no one wants to slap on a ton of make up when it's going to sweat off! Following the same theme my skin care has become seriously streamlined with one cleanser being almost entirely to blame.

Simple make up
It's all about the skin at the moment, any shift in weather makes my skin a little funny for the first week as it handles the change, so instead of smothering it in foundation I've been reaching for a sheer, dewy tinted moisturiser. The perfect little combo at the moment in Laura Mercier's oil free tinted moisturiser and Collection lasting perfection concealer, these two together provide a great finish, slightly dewy but with great targeted coverage.
Everything else is kept super simple, a little hula bronzer for some slight contouring action, a tiny amount of They're Real Mascara (since it's a pain to remove) and just a slight shimmer shade all over the lid, usually Urban Decay's Sin or Mac's All that Glitter. Fresh, Quick and Simple for mornings when getting out of bed is just hard work.

Simple Cleanser
I actually first tried this when my friend let me borrow hers and I liked it so much I went out and bought it myself. Despite going out to get it I'm not going to tell you this is necessary in your life, although I do think something 'like' this is a necessity. It's gentle, it's calming and it does the trick. I've not seen any magical effects from using it but I know that regardless of how my skin is doing this will cleanse without being stripping, or leaving my skin clogged. 
It's biggest selling point for me has got to be that I really can use it on my eyes and it doesn't irritate or make my eyes water - I definitely don't use it daily on my eyes but if it's a late night and I just can't be bothered it gets rid of your eye make up while you cleanse your face. Ss many cleansers claim to be for skin and eyes, maybe it's just me, but I find half of them way to harsh to use anywhere near my eyes.

Here's hoping the warm weather lasts a little longer here - not likely sadly.


Friday, 7 September 2012

NOTD - Short Nails 1.

Since I've been working in retail my nails have taken a real battering, and doing anything remotely fancy with my nails has seemed like a waste of time when I know I'd be lucky if it lasted a day! But one good thing is I can finally do a few easy nail art designs for short nails. 

I chose to wing out my little dots a bit so they look like little tear drops but if you just did normal dots this look would be just as pretty and probably a lot easier for you to have a go at :) 

Polishes used; Models own Jade Green, Barry M White, Cobolt Blue & Black. 

Hope you've enjoyed!! x

Thursday, 27 October 2011

Halloween Nails


As well as doing a few Halloween make up looks I thought I’d show you a few really simple Halloween nail art designs so even if you don’t want to go all out with the make up.
These pumpkin nails are probably my favourite as they take a maximum of 10minutes to do and they’re really cute! They also attracted a lot of compliments when I was wearing these. Simply apply an orange base then once it’s dry dot on the face using a plain black polish then to finish use a clear top coat.
Then there’s the classic spiderweb design, everyone seems to do something like this and I’ve already seen lots of tutorials on different spider webs looks but I thought I should include it anyway as again it’s very simple, quick and really effective too. To do this just have a black coat all over your nails then draw in 3-4 diagonal lines coming from one corner of your nail then join them up :)
This is probably the hardest one to do as it’s a little bit fiddly but if you take your time it’s not that hard. Just apply an orange base coat then do a big black dot for the spiders body and slowly draw in the legs. You’ll have to wait for that to dry completely but then you can do two white dots on each spider for the eyes, again wait for it to dry then do two really really tiny little black dots to finish off.
And finally a Halloween nail art post wouldn’t be complete without a really generic spooky nail! Again I used an orange base, then using a dotting tool I put on some bats and then using the dotting tool I just dragged a black polish into the shape of an old weather-beaten tree on one finger :)

There are absolutely tons of designs you can do like this, I actually did another two but for some reason my computer is being a complete pain and not letting me upload them…

Hope thtis has been helpful!! x

P.S the polished I used were: Barry M Tangerine, Barry M White and Barry M Black

Friday, 14 October 2011

Zombie FOTD


Here’s my third Halloween make up look and this is a pretty generic Halloween make up that I suppose could work for nearly any costume – I’m just going to call this a zombie one though :)
This really is a look anyone can do as you need barely any products and its super quick to do!
  1. Apply a pale foundation or white face paint (I used a white foundation with a little gray eyeshadow) and powder your face
  2. Take a black shadow and start heavily contouring your cheek bones, your temples and your under eyes
  3. Place a black eyeshadow all over your lid and slightly blend out to create a dark smokey eye
  4. Take a black eyeliner and draw on the line of your cut, lightly line your lips then lightly do your brows 
  5. apply a red eyeshadow(you can use a lipstick or a lip liner too) to draw on the open wound and around your eyes
  6. And to finish conceal your lips blending in the eyeliner and apply lashings of mascara- Simple!
 I actually did something really simple to this last year and because there’s nothing fancy, it lasted the whole night with only one quick little touch up. Let me know what you’re going to be this Halloween and if you like this little Halloween make up idea posts :)

Hope you’ve enjoyed!! x

Monday, 19 September 2011

Glitter Icing

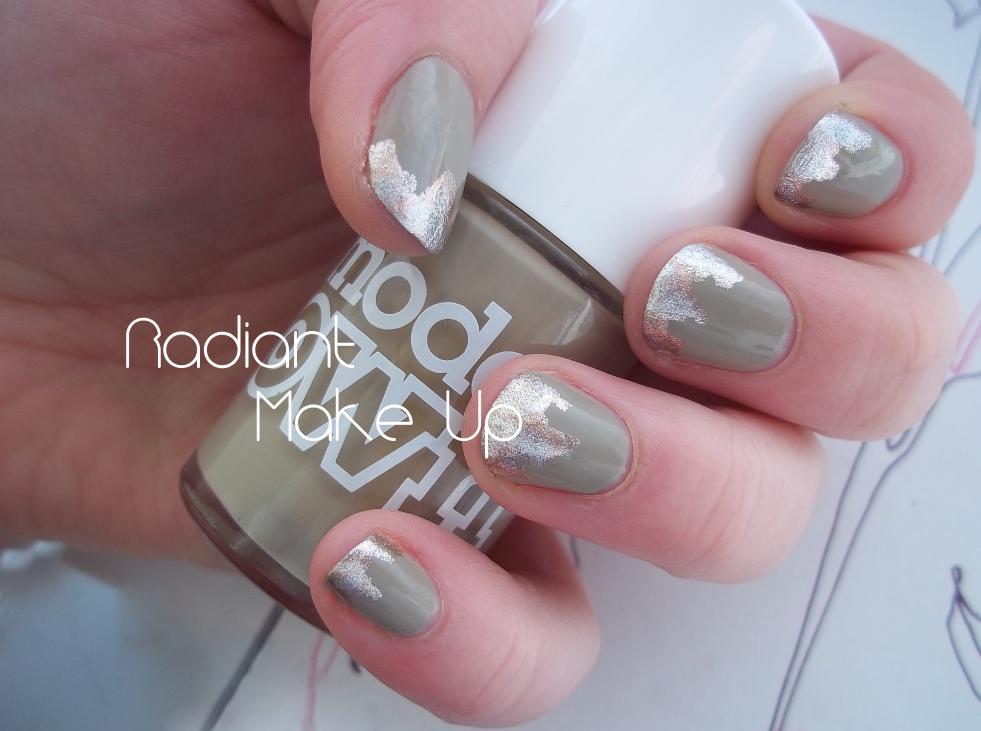
It feels like I haven't done a nail art post in months & missed doing them so much but my camera just doesn't want to focus on my nails!
But I just love how these look I had to post as I'm sure a few of you will like them too :) especially as they are are do quick and simple to do and aren't in your face- theyre subtle enough to get away with for any occasion!

Concrete mixer is definitely turning into one of my favourite polishes, I got it recently in my models pen order for £2.50. It wasn't what I was expecting yet it's honestly the most flattering colour!
Just apply one coat of concrete mixer then I put some champagne on the tip a little like icing.
Once it's dry I put a little of sterling silver as it just adds a really pretty touch
I honestly love this nail art- let me know if you give this a go as it's so simple, pretty and elegant!

Hope you've enjoyed!! x
P.s I've done the whole post on my iPhone with the bloggers app so let me know if something isn't working for you :)

Wednesday, 17 August 2011

Pastel Stripe NOTD

I’ve been meaning to do some striped nails are for months and I refuse for pay £20 for nail art polishes and I couldn’t figure out how to do it with a standard brush. But I played around with it yesterday and I think it looks pretty good considering I didn’t use any nail art tools!
I used...Barry M Fuschia, Baby pink, Mint green, White, Peach melba, Berry ice cream and Cyan blue
.
Basically just get all the light, pastel colours you own and do lots of stripes :) This didn’t take anywhere near as long as I was expecting it too and I can’t wait to do more stripy looks!
Have any of you tried stripy nail art without nail art brushes?
Hope you’ve enjoyed!! x

Tuesday, 2 August 2011

A Rushed FOTD

Before this summer I was pretty much never late, occasionally a few minutes delayed but usually bang on time or quite often early. But since I’ve finished college this year I seem to be constantly rushing around because I’m late!
Face
Skin79 BB cream
Mac studio sculpt concealer
A little bit of Benefit Georgia & Mac soft and Gentle MSF
(but mainly my natural cheek colour as it was so hot)
Eyes
Nouveau lashes which I got in my Glossybox(I didnt think I'd like them but I love them!)
Mac All that glitters all over the lid
Avon white eyeliner as a subtle highlight
Lips
Just a BodyShop lip balm – I can’t cope with anything heavy on my lips in summer!
(These are some sneaky shots I took inside Topshop’s changing rooms because I didn’t have time prior to going out to take some shots of how the waves looked!)
Hair
Once again my beloved Babyliss waving wand which I love & a bit of hair spray

Try to forgive how rushed these were, I tried to quickly take one or two decent shots while running out the door (I actually took them in the car) as I really liked how this looked :)

Hope you've enjoyed!! x

P.S this was taken on a sweltering hot day last week- I want that weather back!

Sunday, 31 July 2011

Silver Elegance NOTD

I love wearing silver on my nails but I always find it’d a difficult one to pull off without your nails looking tacky so I thought I’d show you my favourite way of wearing silver which I think looks pretty elegant actually :)
I do one coat of a matte white polish (Barry M white)
Once it’s dry I apply a dark gray strip at the top (Barry M Gray)
Then a quick coating of a glittery silver polish all over (Collection 2000 inca silver)
Then finish off with a single thin white strip
(Just a little close up oh how pretty the small pieces of glitter look)
It takes less than 10 minutes as I just use very thin coats of everything so it takes no time at all to dry and it never fails to get a compliment whenever I wear it!

What do you think? Will you be trying this out or do you have another favourite way of wearing silver polish?
.
Hope you’ve enjoyed!! x

Monday, 25 July 2011

Standard FOTD

This is another little fotd I wore while going to the cinema with some friends (this time we saw Horrible Bosses.. it was OK, didn’t love it though)It's pretty much my standard 'go to' make up which i fall back on whenever I'm stuck for inspiraiton!
(click the pictures if you want to enlarge)
(I wasn't going to include the picture on the left as I took it by accident but it shows the texture of the products so well and is truer to colour so I thought i'd use it anyway)
Face
BB cream
MAC studio sculpt concealer nc20
MAC MSF in Pearl (I missed the two colours together for a blush – review here)
A light dusting of LancĂ´me setting powder in translucent
Eyes
Smashbox duo in avante grande (great little combo)
Urban Decay twice baked in outer corner to darken it up a little
Maybelline Lash stiletto mascara

Lips
I popped some of E.LFs baby lips liquid lipstick on as I running out the door
Hair
& I didn’t do anything with my hair, I let it dry naturally and just had it down

Hope you’ve enjoyed!! x

P.S let me know if you like these FOTDs or you prefer my usual reviews and nail posts!

Friday, 22 July 2011

Manicure Stripes

I tend to go for brights in summer but this year I’m just loving pale shades. And I’ve been wearing a simple manicure nearly every day (great tutorial on how to do your own manicure here)
But sometimes a simple manicure can get a little boring so this is one look I’ve been wearing when I want something a little prettier but nothing complicated!

I applied a coat of models own buff pink(this is a a very sheer milky pink perfect for manicures)
Then I just applied different coloured stripes to the top of the nail.
(I used white, Gold and Peach melba from barry m)

This is another simple look that I seem to be doing constantly on my nails :)
What do you think?
Hope you’ve enjoyed!! x

Sunday, 17 July 2011

Strawberries and Cream NOTD

After having a really positive response to my previous simple nail art looks (bubbles, Midnight Sparkles,Strawberry Libertine and Glittery green gradient)
I thought I’d post one more which absolutely everyone can do and takes barely any time at all!
I apply two coats of Rimmel’s Strawberry libertine
Once it's dry apply a swipe of Barry M White nail effects in the corner.
;
Up close I think this looks quite pretty but it’s more when you catch a glimpse of it or from far away where it somehow looks really lovely.
I've got both the black and the white nail effect polishes & I've been figuring out a few different ways to wear them however this is by far my favourite!
.
Hope this has been helpful!! x


P.S I’ve got a new header and favicon (the little icon you see next to the web address) & I know I’ve changed my blog’s look a hundred times but I think I’m finally happy – what do you think?

Wednesday, 13 July 2011

Nude Rose FOTD

Another little FOTD :)
I went to the cinema with some friends to see Hangover 2 (Loved it) and I took the opportunity to snap a few pictures!
Face:
Skin 79 BB cream (I finally get why BB creams are raved about!)
Diorskin Sculpt concealer in 01
LancĂ´me Tropiques Minerale in Ochre Doree & E.L.F Tickled pink
Eyes:
Urban decay Foxy cream shadow (this is the same colour as my skin with a bit of sparkle)
Bobbi Brown Gel liner in Black ink (love it)
Avon supershock mascara
Lips:
E.L.F first date lip stain (review here)
Hair:
I just threw it up in a messy bun as I’m still on my 40 heatless days challenge and I couldn’t really be bothered messing with it :)
But my favourite thing was this gorgeous scarf from Urban Outfitters, designed by Pins and Needles. I completely love it :)
I wore it with the rosy cardigan (which you can see) also from Pins and Needles at urban Outfitters and then a simple black dress from H&M
(I attempted an ootd but getting a decent picture is a nightmare–noidea how you fashion bloggers do it!)
Hope you’ve enjoyed!! x

Friday, 17 June 2011

Bubble NOTD

A few people have asked me to do some mini nail tutorials for really simple and quick nail art so here’s one for everyone who asked :)
This particular design looks great on long or short nails and you can easily make something like this unique and put your own twist on it!

You just need three colours & something to create little dots with..
(OPI what’s what the cattitude- Shrek collection, Barry M navy and Barry M Bright blue)


Step 1. Paint your nails one solid colour (I used OPI what’s with the cattitude)
Step 2. Apply random dots in a slightly darker shade (If you don’t have a dotting tool, you can use the end of a hair grip, the tip of a pencil)
Step 3. Then just dot another polish slightly over the dark dots (I prefer to use a shade darker than the original colour but again it’s up to you)

Hope this was helpful!! x

Wednesday, 15 June 2011

Cupcake NOTD

I did this for my birthday(4th June) and I wasn’t sure if was happy with them so I just never got around to posting them. But on my Watermelon NOTD Roxanne mentioned she’d love to see my interpretation of cupcake nails so, here you go :)
There are thousands of different cupcake tutorials and interpretations out there this is just my take on cupcake nails, and they are definitely growing on me!

What do you think?
Hope you’ve enjoyed!! x

P.S sorry for not being able to reply to a lot of my comments on emails, exams are steady taking over my life but my last on is next Tuesday so things should be back to normal soon!

Saturday, 11 June 2011

Rhinestone NOTD

I finally bought some rhinestones for some nail art and I went a tiny bit crazy with them…
I used Eyeko’s Rain Polish on all my nails and then just dotted on some rhinestones using a clear polish to stick them down.

I originally did this as a bit of fun but I actually think this would look really lovely on an accent nail for a night out or if you just want seriously glammed up nails for a big event :)
What do you think?

This is just a little post as I’ve a few longer ones coming up shortly & I didn’t want to overwhelm you with tons of long posts!

Wednesday, 1 June 2011

Watermelon NOTD

This is another little post dedicated to achieving the cutest nails possible, this time I’m venturing into the fruit department with watermelon nails!
This is just as simple as my strawberry nails, which are super easy to do but looks pretty impressive :)

1. Apply a red base (I love Revlon red by Revlon as you only need one coat!)
2. Swipe on a white line like a French manicure (Barry M White)
3. Do a line of green at the top of the nail (Barry M Spring green)
4. To finish just dot on either white or black dots - done!
Hope you’ve enjoyed!! x

P.S If you ever do any of these looks I’d love to see (a few people have already emailed me some pictures letting me see so if you can I’d love to have a look!!)