; />
Showing posts with label tutorial. Show all posts

Thursday, 27 October 2011

Halloween Nails


As well as doing a few Halloween make up looks I thought I’d show you a few really simple Halloween nail art designs so even if you don’t want to go all out with the make up.
These pumpkin nails are probably my favourite as they take a maximum of 10minutes to do and they’re really cute! They also attracted a lot of compliments when I was wearing these. Simply apply an orange base then once it’s dry dot on the face using a plain black polish then to finish use a clear top coat.
Then there’s the classic spiderweb design, everyone seems to do something like this and I’ve already seen lots of tutorials on different spider webs looks but I thought I should include it anyway as again it’s very simple, quick and really effective too. To do this just have a black coat all over your nails then draw in 3-4 diagonal lines coming from one corner of your nail then join them up :)
This is probably the hardest one to do as it’s a little bit fiddly but if you take your time it’s not that hard. Just apply an orange base coat then do a big black dot for the spiders body and slowly draw in the legs. You’ll have to wait for that to dry completely but then you can do two white dots on each spider for the eyes, again wait for it to dry then do two really really tiny little black dots to finish off.
And finally a Halloween nail art post wouldn’t be complete without a really generic spooky nail! Again I used an orange base, then using a dotting tool I put on some bats and then using the dotting tool I just dragged a black polish into the shape of an old weather-beaten tree on one finger :)

There are absolutely tons of designs you can do like this, I actually did another two but for some reason my computer is being a complete pain and not letting me upload them…

Hope thtis has been helpful!! x

P.S the polished I used were: Barry M Tangerine, Barry M White and Barry M Black

Friday, 21 October 2011

Tiger FOTD

I did this Halloween look over a week ago but for some reason I wasn’t quite happy with it so I never got around to posting it but, looking at it again I thought I might as well- hopefully it’ll give someone out there an idea for what to wear to a costume party :)
This one is just as simple as my other Halloween looks but it just takes a little longer to do, all you’ll need is a foundation, a white eyeliner, a contouring powder, an orange and a black eyeshadow, eyeliner and a mascara.
1. Apply your foundation (I opted for matte full coverage)
2. Sharply contour cheekbones & temples
3. Go around the contouring with the orange shadow
4. Draw on lightened areas with a white liner and blend
5. Sketch on stripes, liner and broaden out the nose with an eyeliner
6. Go over the liner with a black shadow to darken & draw on the lip
7. Conceal lower lip, apply mascara and touch up
8. Do your hair and your ready to do!

The more I look at this the more I like it but I’m still not 100% happy with it, what do you think? Have you decided on what you’re going to be this Halloween? I still can’t choose between the Fairy, the Mermaid and the Zombie!

Hope this has been Helpful!! x

Wednesday, 12 October 2011

Mermaid FOTD

This is my second look for my Halloween Series and I had a mermaid in mind when I did it but a few people have said it could be used for a simple avatar make up look if you alter the colours a little it’d also be great for a water nymph!
I really really love how this turned out as I wasn’t sure it’d work but I’m seriously chuffed. All you need is a foundation, a powder (ideally translucent if you’re going for a pale look but a coloured powder will be fine), some netting (I got mine from a bunch of oranges!), a turquoise eye shadow, a royal blue eye shadow, black eyeliner , a mascara and a lip balm.


1. Apply a pale foundation as a base – I used my normal studio sculpt mixed with some of barry M’s white foundation crème, then lightly powder your skin so it’s easier to blend the blue eye shadow out in the next step
2. Carefully place the netting on one side of your face, then gently start tapping the blue eye shadow over it.
3. Continue this all over your face, just try to make sure the netting is fairly taut and isn’t moving around too much otherwise you won’t get the scaly effect
4. Then take the turquoise shadow and apply this all over your lid and into the ‘scales’ around your face.
5. Use the royal blue shadow to contour your eyes and add some dimension; again blend well
6. Apply your eyeliner, I chose to do an extended wing and take it down the inner corner but thats completely optional.
7. For the lips line with a black eyeliner, then mix some lip balm and a blue shadow together to great a blue tinted lip balm and apply to your lips.
8. To finish just apply lashings of mascara and false lashes if you fancy!
(and just so you can see what it looks like if you decide to keep your hair down)
It sounds a little complicated but I promise it’s not, just take your time and have fun with it!
I’ve got another 4 Halloween posts coming up before the 31st but if you’ve and requests just let me know as I’m sure I can sort out another look :)
Hope you’ve enjoyed!! x

Wednesday, 5 October 2011

Fairy FOTD


I’m not normally the sort to get that excited about Halloween, don’t get me wrong I’ve always liked it but never been that into it. This year though I’m really in the mood to do some fun Halloween looks and this is the first of them!

I suppose this could be lots of different things, I had a fairy in mind when I did it but a nymph or an elf or some other mythical creature would probably work just as well :)  it took a little longer than I originally expected as I had to go over the lines of the ‘mask’ more than once but it wasn’t difficult (if you’re going to do something similar I’d definitely sketching out a plan before hand!)

I used three eyeshadows, a bright green, a deeper forest green and then a bright baby pink for the cheeks as I didn’t have a blush bright enough. A gel eyeliner and lots of mascara – it’s definitely something you can do on a budget without having to buy lots of colours you’ll never use again.
I also tried pairing this with a nude lip and although I think it’s really pretty, I just can’t pull off nude lips so I’d stick with some sort of definition :)

I’ve already done two other Halloween looks which I’ll post in the next few days as we get closer to Halloween but so far this looks like the favourite for what I’ll actually be doing on Halloween as I seriously love how all the green shadow makes my eyes stand out!

Hope you’ve enjoyed!! x

Wednesday, 10 August 2011

Tropical NOTD

I think it’s fair to say the weather this summer has been a bit rubbish in England - It started off well with June being gorgeous and then it’s steadily gone down hill!
So to cheer myself up while dismal rain clouds are looming overhead I did some fun, bright and most importantly SUMMERY nails :)
I just wanted something warm, fun and simple.
I used Barry M Yellow, Fuchia and Red and quickly did stripes of them, roughly on my nail. I applied each colour while the previous polish was wet and I got this effect!
After a few days of the tropical look I applied a thin coat of a white polish.
Once it was dry I simply took some nail polish remover and ta-da, a completely different look!

Let me know what you think of both of these looks and whether you’ll be giving either a go!

Hope you’ve enjoyed!! x
P.S I know these slightly messy looking nails aren't for everyone but I quite like them as a change from my usually neat nail art!

Sunday, 31 July 2011

Silver Elegance NOTD

I love wearing silver on my nails but I always find it’d a difficult one to pull off without your nails looking tacky so I thought I’d show you my favourite way of wearing silver which I think looks pretty elegant actually :)
I do one coat of a matte white polish (Barry M white)
Once it’s dry I apply a dark gray strip at the top (Barry M Gray)
Then a quick coating of a glittery silver polish all over (Collection 2000 inca silver)
Then finish off with a single thin white strip
(Just a little close up oh how pretty the small pieces of glitter look)
It takes less than 10 minutes as I just use very thin coats of everything so it takes no time at all to dry and it never fails to get a compliment whenever I wear it!

What do you think? Will you be trying this out or do you have another favourite way of wearing silver polish?
.
Hope you’ve enjoyed!! x

Friday, 22 July 2011

Manicure Stripes

I tend to go for brights in summer but this year I’m just loving pale shades. And I’ve been wearing a simple manicure nearly every day (great tutorial on how to do your own manicure here)
But sometimes a simple manicure can get a little boring so this is one look I’ve been wearing when I want something a little prettier but nothing complicated!

I applied a coat of models own buff pink(this is a a very sheer milky pink perfect for manicures)
Then I just applied different coloured stripes to the top of the nail.
(I used white, Gold and Peach melba from barry m)

This is another simple look that I seem to be doing constantly on my nails :)
What do you think?
Hope you’ve enjoyed!! x

Sunday, 17 July 2011

Strawberries and Cream NOTD

After having a really positive response to my previous simple nail art looks (bubbles, Midnight Sparkles,Strawberry Libertine and Glittery green gradient)
I thought I’d post one more which absolutely everyone can do and takes barely any time at all!
I apply two coats of Rimmel’s Strawberry libertine
Once it's dry apply a swipe of Barry M White nail effects in the corner.
;
Up close I think this looks quite pretty but it’s more when you catch a glimpse of it or from far away where it somehow looks really lovely.
I've got both the black and the white nail effect polishes & I've been figuring out a few different ways to wear them however this is by far my favourite!
.
Hope this has been helpful!! x


P.S I’ve got a new header and favicon (the little icon you see next to the web address) & I know I’ve changed my blog’s look a hundred times but I think I’m finally happy – what do you think?

Friday, 17 June 2011

Bubble NOTD

A few people have asked me to do some mini nail tutorials for really simple and quick nail art so here’s one for everyone who asked :)
This particular design looks great on long or short nails and you can easily make something like this unique and put your own twist on it!

You just need three colours & something to create little dots with..
(OPI what’s what the cattitude- Shrek collection, Barry M navy and Barry M Bright blue)


Step 1. Paint your nails one solid colour (I used OPI what’s with the cattitude)
Step 2. Apply random dots in a slightly darker shade (If you don’t have a dotting tool, you can use the end of a hair grip, the tip of a pencil)
Step 3. Then just dot another polish slightly over the dark dots (I prefer to use a shade darker than the original colour but again it’s up to you)

Hope this was helpful!! x

Saturday, 11 June 2011

Rhinestone NOTD

I finally bought some rhinestones for some nail art and I went a tiny bit crazy with them…
I used Eyeko’s Rain Polish on all my nails and then just dotted on some rhinestones using a clear polish to stick them down.

I originally did this as a bit of fun but I actually think this would look really lovely on an accent nail for a night out or if you just want seriously glammed up nails for a big event :)
What do you think?

This is just a little post as I’ve a few longer ones coming up shortly & I didn’t want to overwhelm you with tons of long posts!

Tuesday, 7 June 2011

Sunset NOTD

These have got to be one of my favourite nail art designs and it’s surprisingly simple
(possibly not the best design to start with if you’re a complete beginner)

I can’t take credit for this lovely design as I’ve seen similar ones all over the place, just type sunset nails into google and you’ll end up with hundreds of slight variations on this look, some very simple and some crazily detailed!

1. Apply a stripe of gold for the sand at the bottom on your nail
(I used yellow and then gold over the top from barry m)
2. Once that's dry apply a blue stripe for the sea
3. Once that's dry apply a coral stripe
4. Once that's dry apply an orange stripe
5. Then apply a yellow stripe at the top just before the orange dries
(these two colours should hopefully blend a little)

7. Once it's dry, use a nail art dotter to slowly dot on the palm tree in black.
(alternatively you can use a cocktail stick or the end of a hair grip)
This is the hardest bit so take your time.
8. Once everything is dry apply a clear top coat and your done!

Hope you’ve enjoyed!! x


(you could do this on every finger or something similar, I chose to just apply a plain coat of coral to my other nails though so my thumbs remained the focal point)

Wednesday, 1 June 2011

Watermelon NOTD

This is another little post dedicated to achieving the cutest nails possible, this time I’m venturing into the fruit department with watermelon nails!
This is just as simple as my strawberry nails, which are super easy to do but looks pretty impressive :)

1. Apply a red base (I love Revlon red by Revlon as you only need one coat!)
2. Swipe on a white line like a French manicure (Barry M White)
3. Do a line of green at the top of the nail (Barry M Spring green)
4. To finish just dot on either white or black dots - done!
Hope you’ve enjoyed!! x

P.S If you ever do any of these looks I’d love to see (a few people have already emailed me some pictures letting me see so if you can I’d love to have a look!!)

Thursday, 19 May 2011

Midnight sparkles NOTD

I was in the mood this week to do something a little darker than normal but a little bit different to the classic black polish I normally wear for a night out.
I used one coat of cobalt blue and then one coat of Navy from Barry M because I couldn’t decide which one I wanted! I then did a swipe of collection 2000 Inca silver glitter to create a pretty, subtle classic nail look which anyone could do!
Hope you’ve enjoyed!! x

P.S a lot of these posts from now on are probably prewritten as its exam season so if I don’t reply straight away but I’ll get back to everyone eventually!! :)

Wednesday, 11 May 2011

Mermaid EOTD

I was playing around with my 180 palette the other day and I decided to make use of some really pretty shimmer sea foam green colours and I really love how this looks and it’s incredibly easy so anyone could recreate this look!
I just applied a gorgeous shimmery green all over the lid and crease area then applied a slightly more blue shadow as exagerated cat-eyeliner and blended really well :)

Something like this would look beautiful with false lashes but for me I thought my natural ones would do as the colours really are the focal point of this look and I didn’t want anything to distract from them :)

Hope you’ve enjoyed!! x

(This is another quick little post, but I've got some longer ones coming up - do you prefer these short ones or my longer ones? or a mixture of both?)

Sunday, 1 May 2011

Colour Blocking EOTD

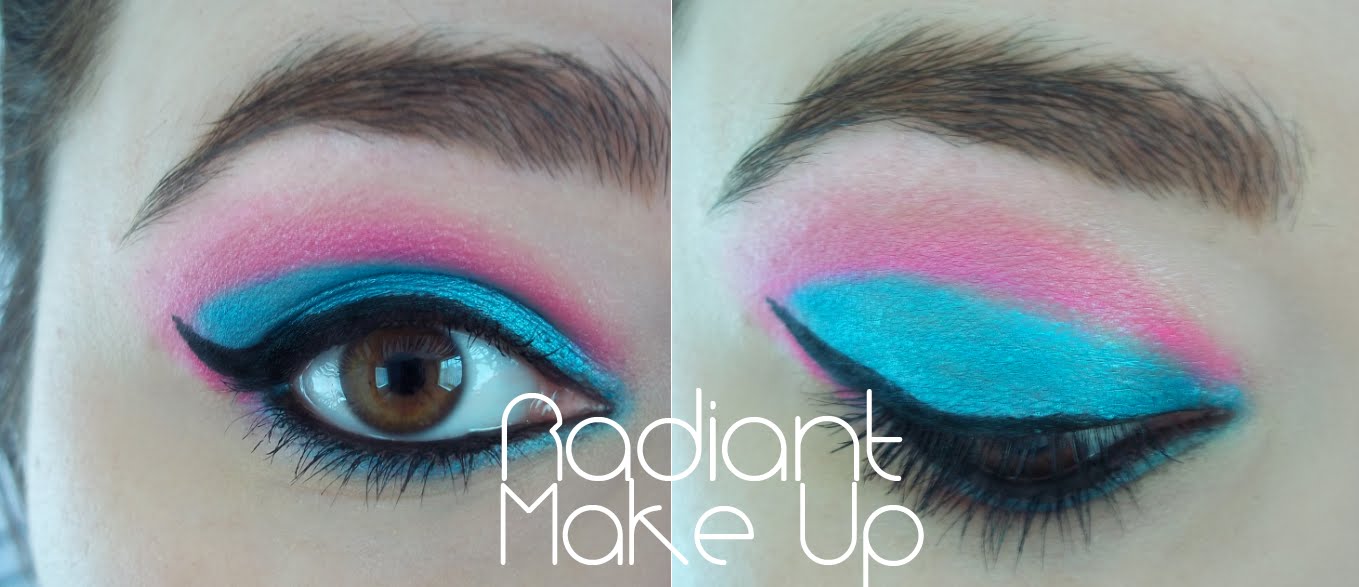
Colour Blocking was all over the catwalks this season and I love how it looks and the other day while thinking about what to wear I decided to do my own version of colour blocking on my eyes :)I went for a bright blue (Urban Decay's Peace) all over the lid and tried to create a very definite and sharp eye shape with a bright pink (Barry M's 85 - Neon Pink) all around the edges.

To finish up I applied a strong black cat-eye liner and lots of mascara!

Let me know what you think – Hope you’ve enjoyed!! x

P.S I’ve reached 400 followers!!!

Tuesday, 19 April 2011

Funky Abstract NOTD

I just wanted to share these pretty abstract nails I did this morning!
I normally stick with cute and pretty nail art designs but I fancied doing something a little different today with lots of bright colours – what do you think?

Surprisingly this was just as easy as a lot of my other designs this one is just more time consuming as there are quite a few steps and you need to wait for each colour to dry before moving on!
Would any of you wear something like this?
Hope you’ve enjoyed!! x


P.S would anyone be interested in a little tutorial of how I did this?

Tuesday, 12 April 2011

PawPrint NOTD

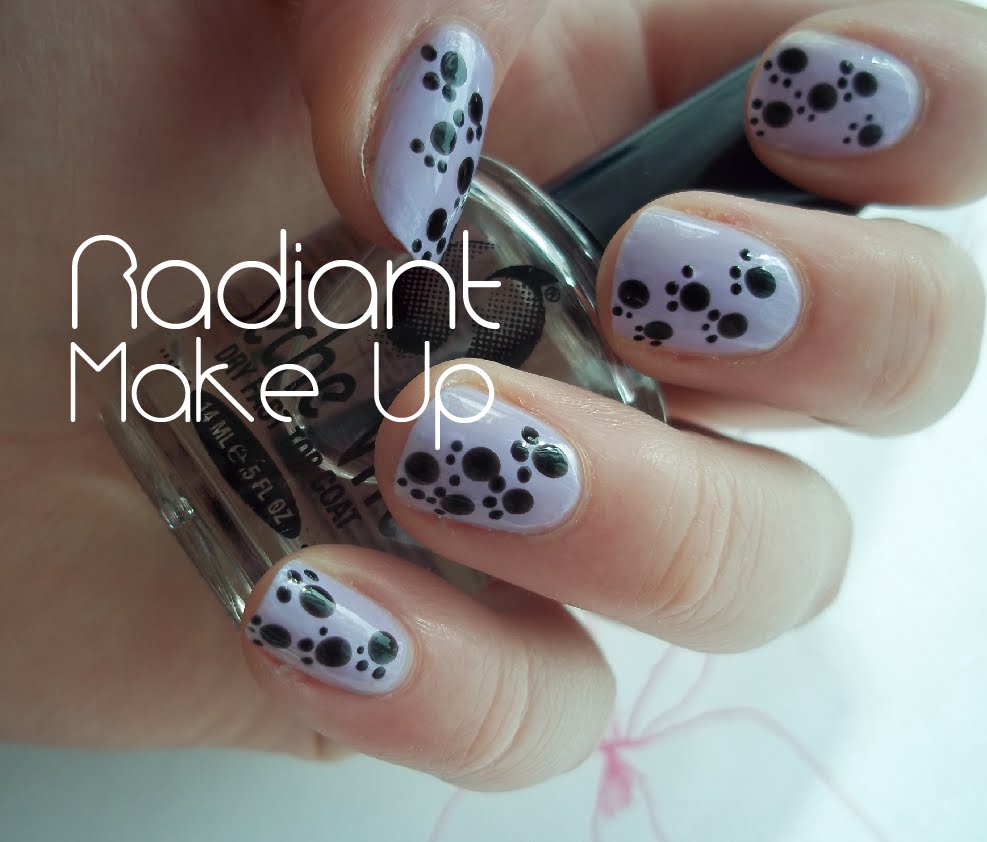
I’ve been meaning to do this look for a while and the other day after applying a coat of OPI’s Rumple’s wiggin’ I thought it was the perfect colour to do some paw prints across :)
I really love it, it’s cute and actually really simple as it’s just lots of little black dots!
If you want to recreate this look simply paint your nails what ever colour you prefer (think this looks best of pastels as it just makes the look really sweet) then apply medium sized dots where you want the paw prints to be.. (these will be the soles or pads!)
Then try and do three smaller dots at the top of each circle to get your finished paw print!

I wouldn’t recommend doing paw prints all over the nails just because that might be too much and a little tip – take your time with these dots!

Will any of you be trying this look out?? Hope you’ve enjoyed!! x

Wednesday, 30 March 2011

STRAWBERRY NOTD

It’s officially the British Summer Time now the clocks have gone forward(although I still class this time of year as spring..) But that’s a great excuse to start wearing bright colours and doing cute little looks like this…STRAWBERRIES :)

For this, Just paint your nails red(or pink if you prefer), I used Revlon’s ‘Revlon Red’ which is completely opaque after one coat!
Once that’s dry, apply a few little white dots, I used Barry M’s Matte White..
Then do three(or four if you want) green dots, I used Barry M Spring Green at the top of your nail, then slowly smudge it down so it looks like you’ve got little leaves!
so long as you take your time you can do it on both hands :)
Hope you’ve enjoyed!! x

Monday, 7 March 2011

NOTD Glittery Green Gradient

I’ve seen loads of gradient nails around recently and I really wanted to do something similar but most gradient effects require using a sponge and I just didn’t want all that sort of hassle –
I like my nails to be quite simple and easy!
So instead of using normal opaque nail polishes which are harder to blend together I used two glitter polishes and I’m actually really happy with how they look:)I used models own in Emerald City(the chunky green glitter) and Collection 2000 maxiflex in Inca Silver.

I applied a little bit of the green on the tips
Once that had dried I put a light coat of silver all the nail..
And then I just went over the tips with the same chunky green glitter and flicked it down the nail so there wasn’t a straight line separating the two polishes
(and then just use a top coat to help prevent chipping - although sorting out chips is really easy with this look!)If you’re going to do something similar with different colours the models own glitter polishes work really well as they are all pretty chunky and not so tightly packed with glitter that it’d be difficult to get the gradient effects :)

Hope you enjoyed!! x

Wednesday, 5 January 2011

NOTD Leopard

I did this for New Year and I figured I’d share the nail art with you as it’s incredibly simple and quick so anyone can do it.
I applied a coat of Estee lauder ‘Frozen Fantasy’ (just because it’s one of the only brown polishes I own) and then put a light layer of Barry M’s ‘Gold’. Obviously you can make the background as glittery as you like – I know a few people who don’t normally wear polish wanted something a little more muted and have done a similar look with just a plain brown background!
Then I just used my dotting tool to ‘dot’ on the leopard print :)
Simples!
P.S What do you think of the Blog's new look?